
Buttons and Switches- Every Setting On Your DSLR Explained (Part One)


On-Camera Buttons and Switches
Understanding all your camera’s capabilities is a huge advantage when trying to create great photos. DSLRs have a huge variety of settings and features, most of which people either don’t understand, or just simply ignore. This is a comprehensive guide to every single one of your cameras settings, where they are, and what they do. I will go through what every button does, and what all the menu settings do, and I will be using a Nikon D600 for this tutorial. Every camera is different, so therefore your camera may differ slightly, but the majority of the settings are universal across most camera brands, you just may find that some buttons or settings may be in different places. There’s a huge amount of information, therefore I will be splitting this post into multiple parts. Here in part one, we shall go through all the on-camera buttons and switches.
Power Switch/ Shutter Release Button
Starting with an obvious one here! The outside is the switch to turn your camera on and off, and the middle is the shutter release button you press to capture a photo. You can also switch it further to the right to light up the camera display in low light.

Exposure Meter
Allows you to decrease or increase the exposure of your image in both auto and manual modes. You can adjust it by pressing down on the +/- button and turning the wheel left or right. The exposure value selected will appear on the display. The value ‘0.0’ means it is neutral.


Focus Point
This alters the point at which your camera focuses. Pressing the button and turning the wheel will enable you to switch between the different focusing modes, for example single focal points or multi focal points.


Screen
This displays all the essential information such as what aperture, shutter speed and ISO you are using, as well as the exposure meter, focus point, amount of shots taken, battery level and which SD card slot is currently in use.

Hotshoe
The component on top of your camera nestled in-between the in-built flash. This allows you to attach external devices to your camera such as flash guns or triggers.

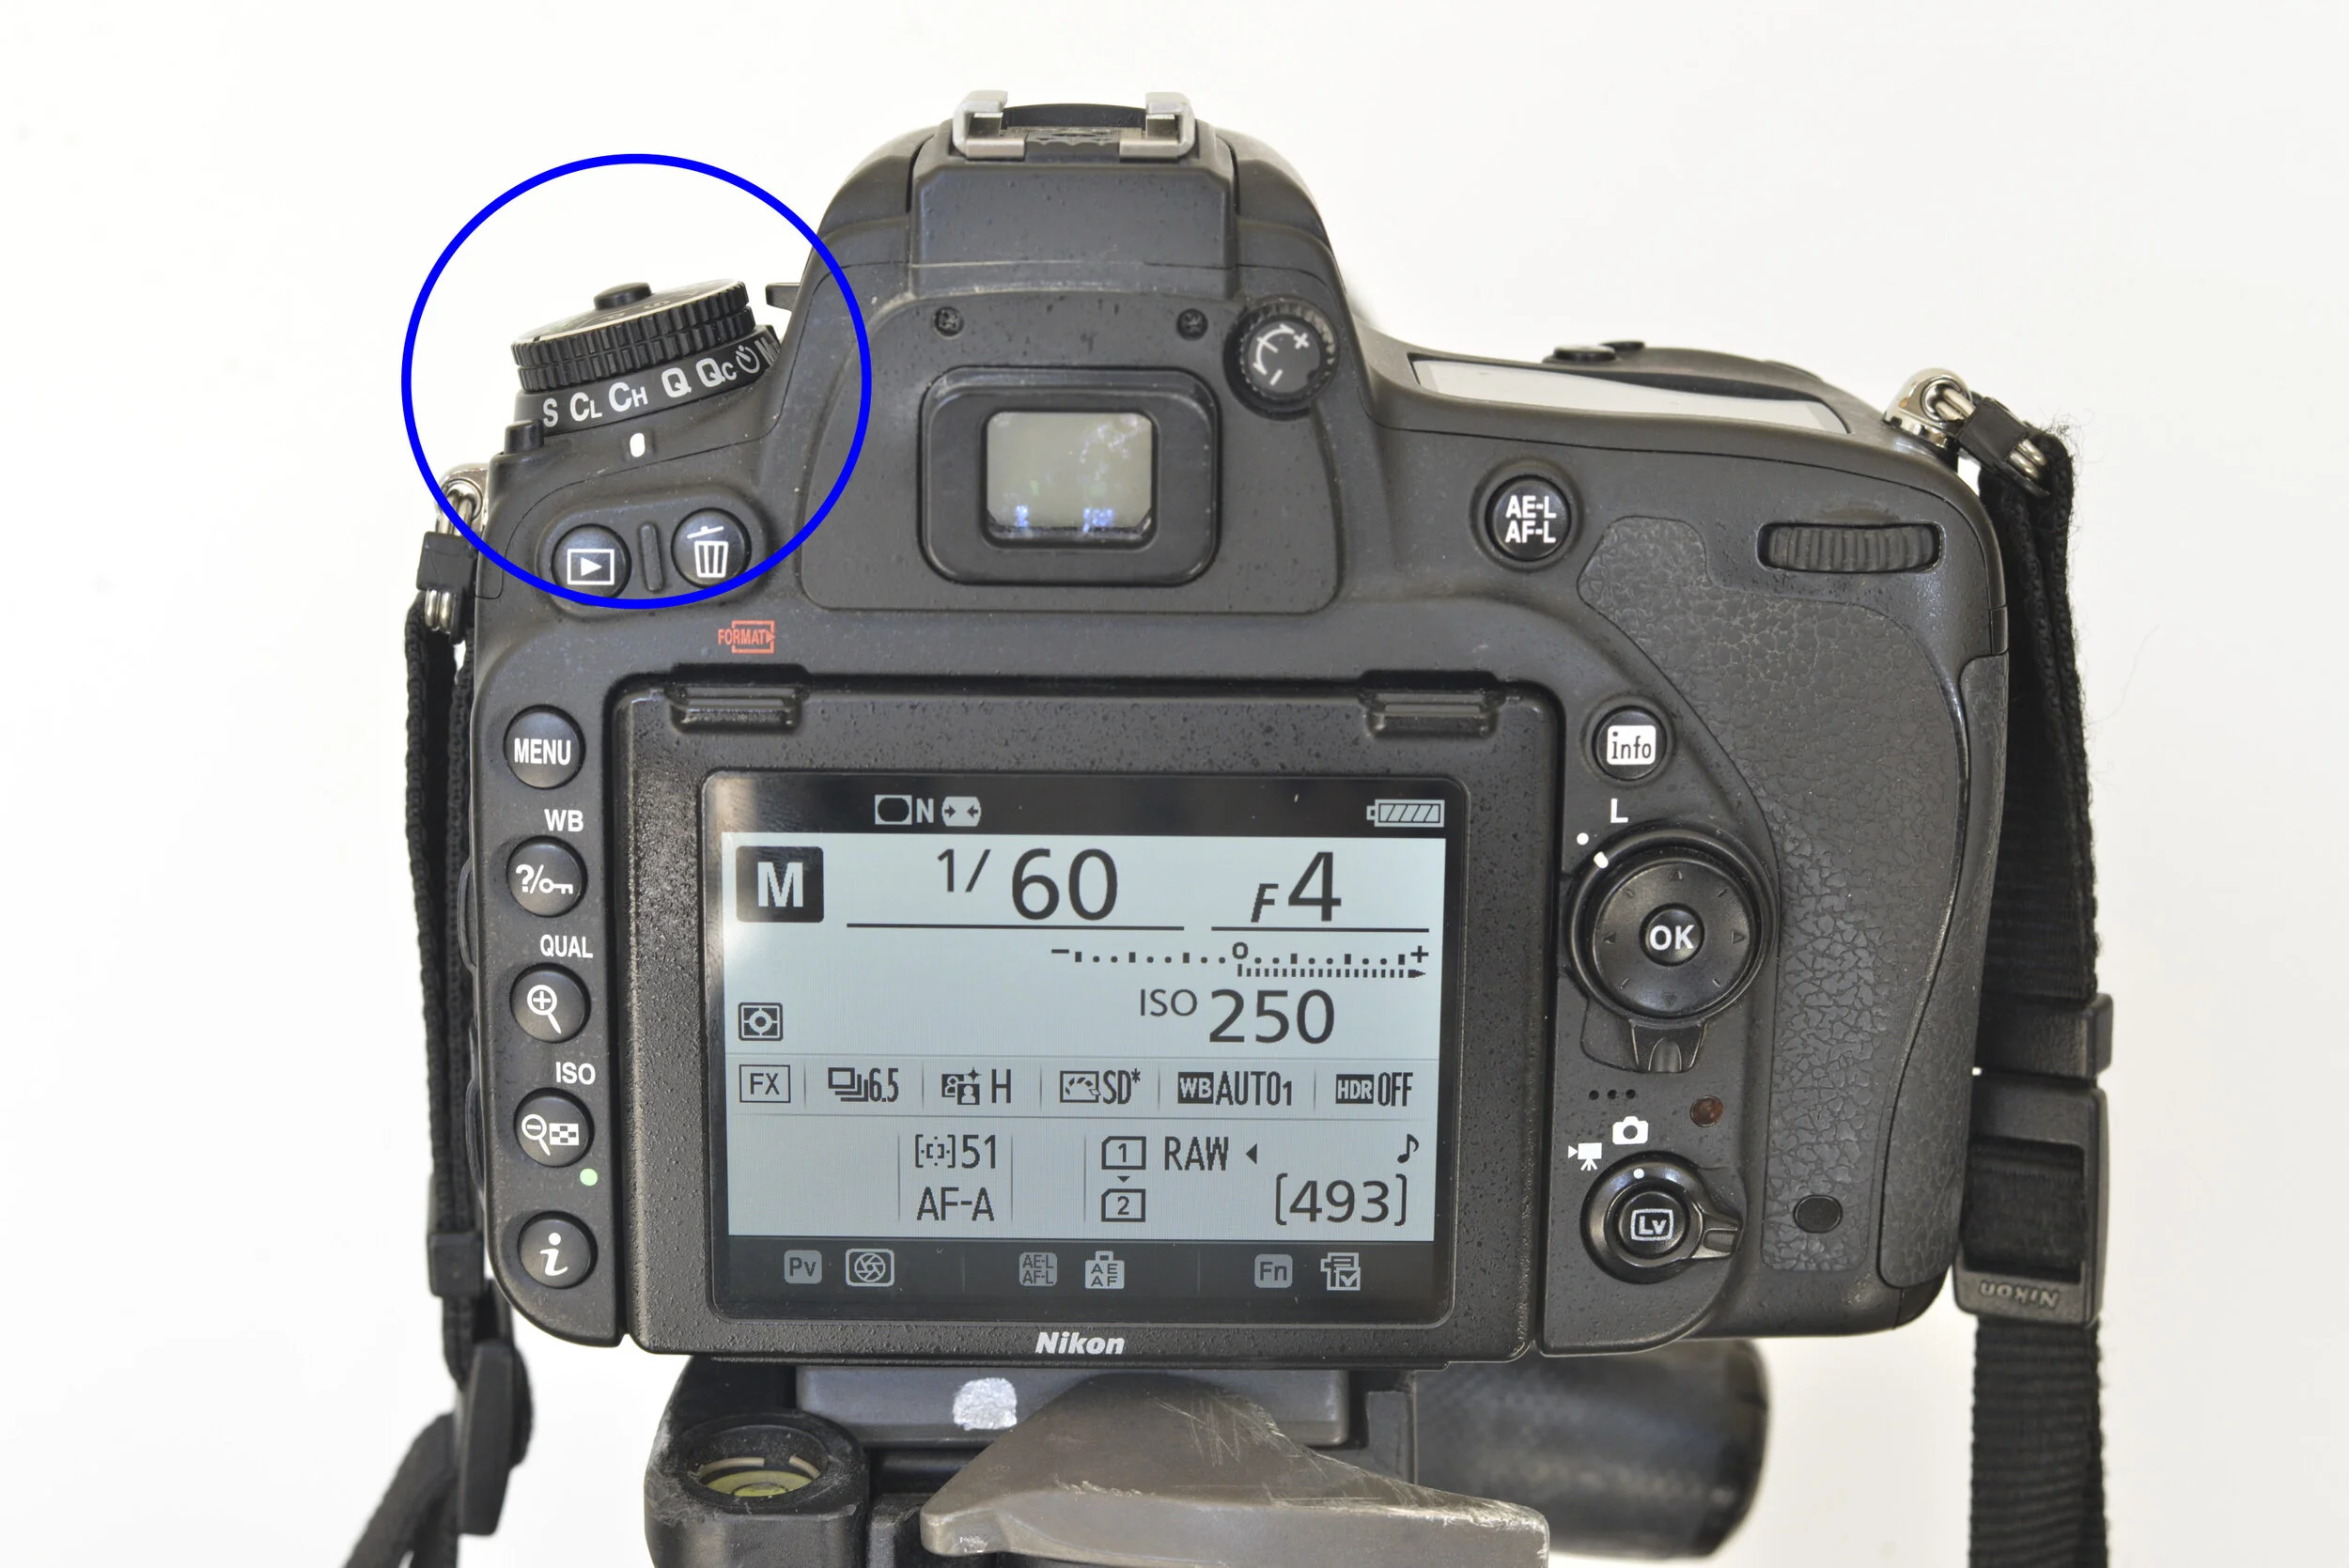
Shooting Mode Wheel
This enables you to change between all the different shooting modes (such as manual or automatic settings) and the type of shot release you want (such as single shot, continuous or timer). We will now go through each of these modes and what they do below.

Single Shot (S)
Takes one single shot when the shutter release is pressed.

Burst Shots (CL)
CL stands for continuous low speed. Whilst the shutter release button is held down the camera will continually take photos at the selected frame rate (between 1-7 frames a second) until the button is released.

Continuous Burst (CH)
CH stands for continuous high speed. Whilst the shutter release button is held down the camera will continually take photos at the selected frame rate (up to 8 frames a second) until the button is released. This mode is appropriate for capturing fast moving objects.
Q Shot
Stands for quiet shutter release. This mode takes a single shot whilst disabling the beep you hear when the camera automatically focuses. It also stops the mirror clicking back into place whilst the shutter release is fully pressed, therefore allowing for quieter shooting.

QC Shot
QC stands for quiet continuous. It is the same as Q mode, except instead of one single shot, the camera continuously takes photos at a rate of 3 frames per second whilst the shutter release is held down. It is a quieter CL mode.

Timer
This allows you to take photos using the self timer. You can adjust the time it takes between the shutter release being pressed and the photo being taken, allowing you to take self portraits, group shots or to reduce any motion blur when using a slow shutter speed and a tripod.

Bulb (MUP)
Bulb is also known as MUP mode (Mirror Up). This is a useful mode for minimizing any camera shake when doing close up photos or using a telephoto lens. You can also create very long exposures with this mode as the mirror will stay up for the entire time the shutter release is pressed. This is particularly useful for astrophotography when the shutter speed is longer than 30 seconds. The length of time you can use this for will greatly depend on your memory card and the camera’s memory buffer (a type of in-built camera memory where your images are temporarily stored before being transferred to the memory card).

Manual Mode (M)
Both the aperture and shutter speed settings are controlled by the photographer. This allows for more versatile shooting.

Aperture Priority Mode (Av)
In this mode the photographer chooses the aperture and the camera selects the appropriate shutter speed for you, in order to correctly expose the image.

Shutter Priority Mode (S)
The opposite of aperture priority mode. In this mode the photographer chooses the shutter speed and the camera selects the appropriate aperture for you, in order to correctly expose the image.

Program Mode (P)
Also known as programmed auto (no the P doesn’t mean ‘professional’ I’m afraid!). The camera chooses both the shutter speed and aperture for you, but the photographer can choose between different combinations of aperture and shutter speed that create the same exposure. Allows more flexibility than auto mode but not as much as manual mode.

Auto Mode
Where the camera chooses all the exposure settings for you in order to create a correctly exposed image.

No Flash Mode
When shooting in auto mode, the camera may engage the pop-up flash in lower light. If you want to shoot auto but want to prevent the flash from being used, you can select this mode instead.

U1 Mode
This means ‘user defined settings’. You can save particular exposure settings that you frequently use so every time you select U1 the camera will apply those particular settings for you.

U2 Mode
The same as U1. Having another U mode means you can save multiple settings.

Scene Mode
Where the camera automatically selects the aperture and shutter speed that it thinks is appropriate for the scene you will be shooting. For example, if you choose portrait mode, the camera will favour a wider aperture, whereas in landscape mode it will favour a smaller aperture. You can select the scene you wish to choose by scrolling with the wheel once scene mode is selected.


Effects Mode
This mode allows you to apply certain effects to your photos. Just like Scene mode, you can scroll through the different effects using the wheel once Effects is selected. There are a wide variety of effects to choose from such as black and white, selective colour and more.


Viewfinder Focus
There is a small lens in your viewfinder called a diopter. This can be adjusted to increase the sharpness of the image you see through the viewfinder, which is particularly useful if your eyesight isn’t 100%. Looking through a viewfinder if you’re wearing glasses can be difficult, so you can change the focus of your viewfinder to match your eye sight using this wheel. It works in a similar way to reading glasses so it is very useful, though it won’t help if you have a particular issue with your eyes of course.

AEL/AFL
AEL stands for automatic exposure lock and AFL stands for automatic focus lock. You use this button whenever you want to fix your current focus or exposure whilst taking photographs, so it is mostly used in auto modes. It is particularly useful when shooting images you intend to stitch together later, such as a panoramic image.

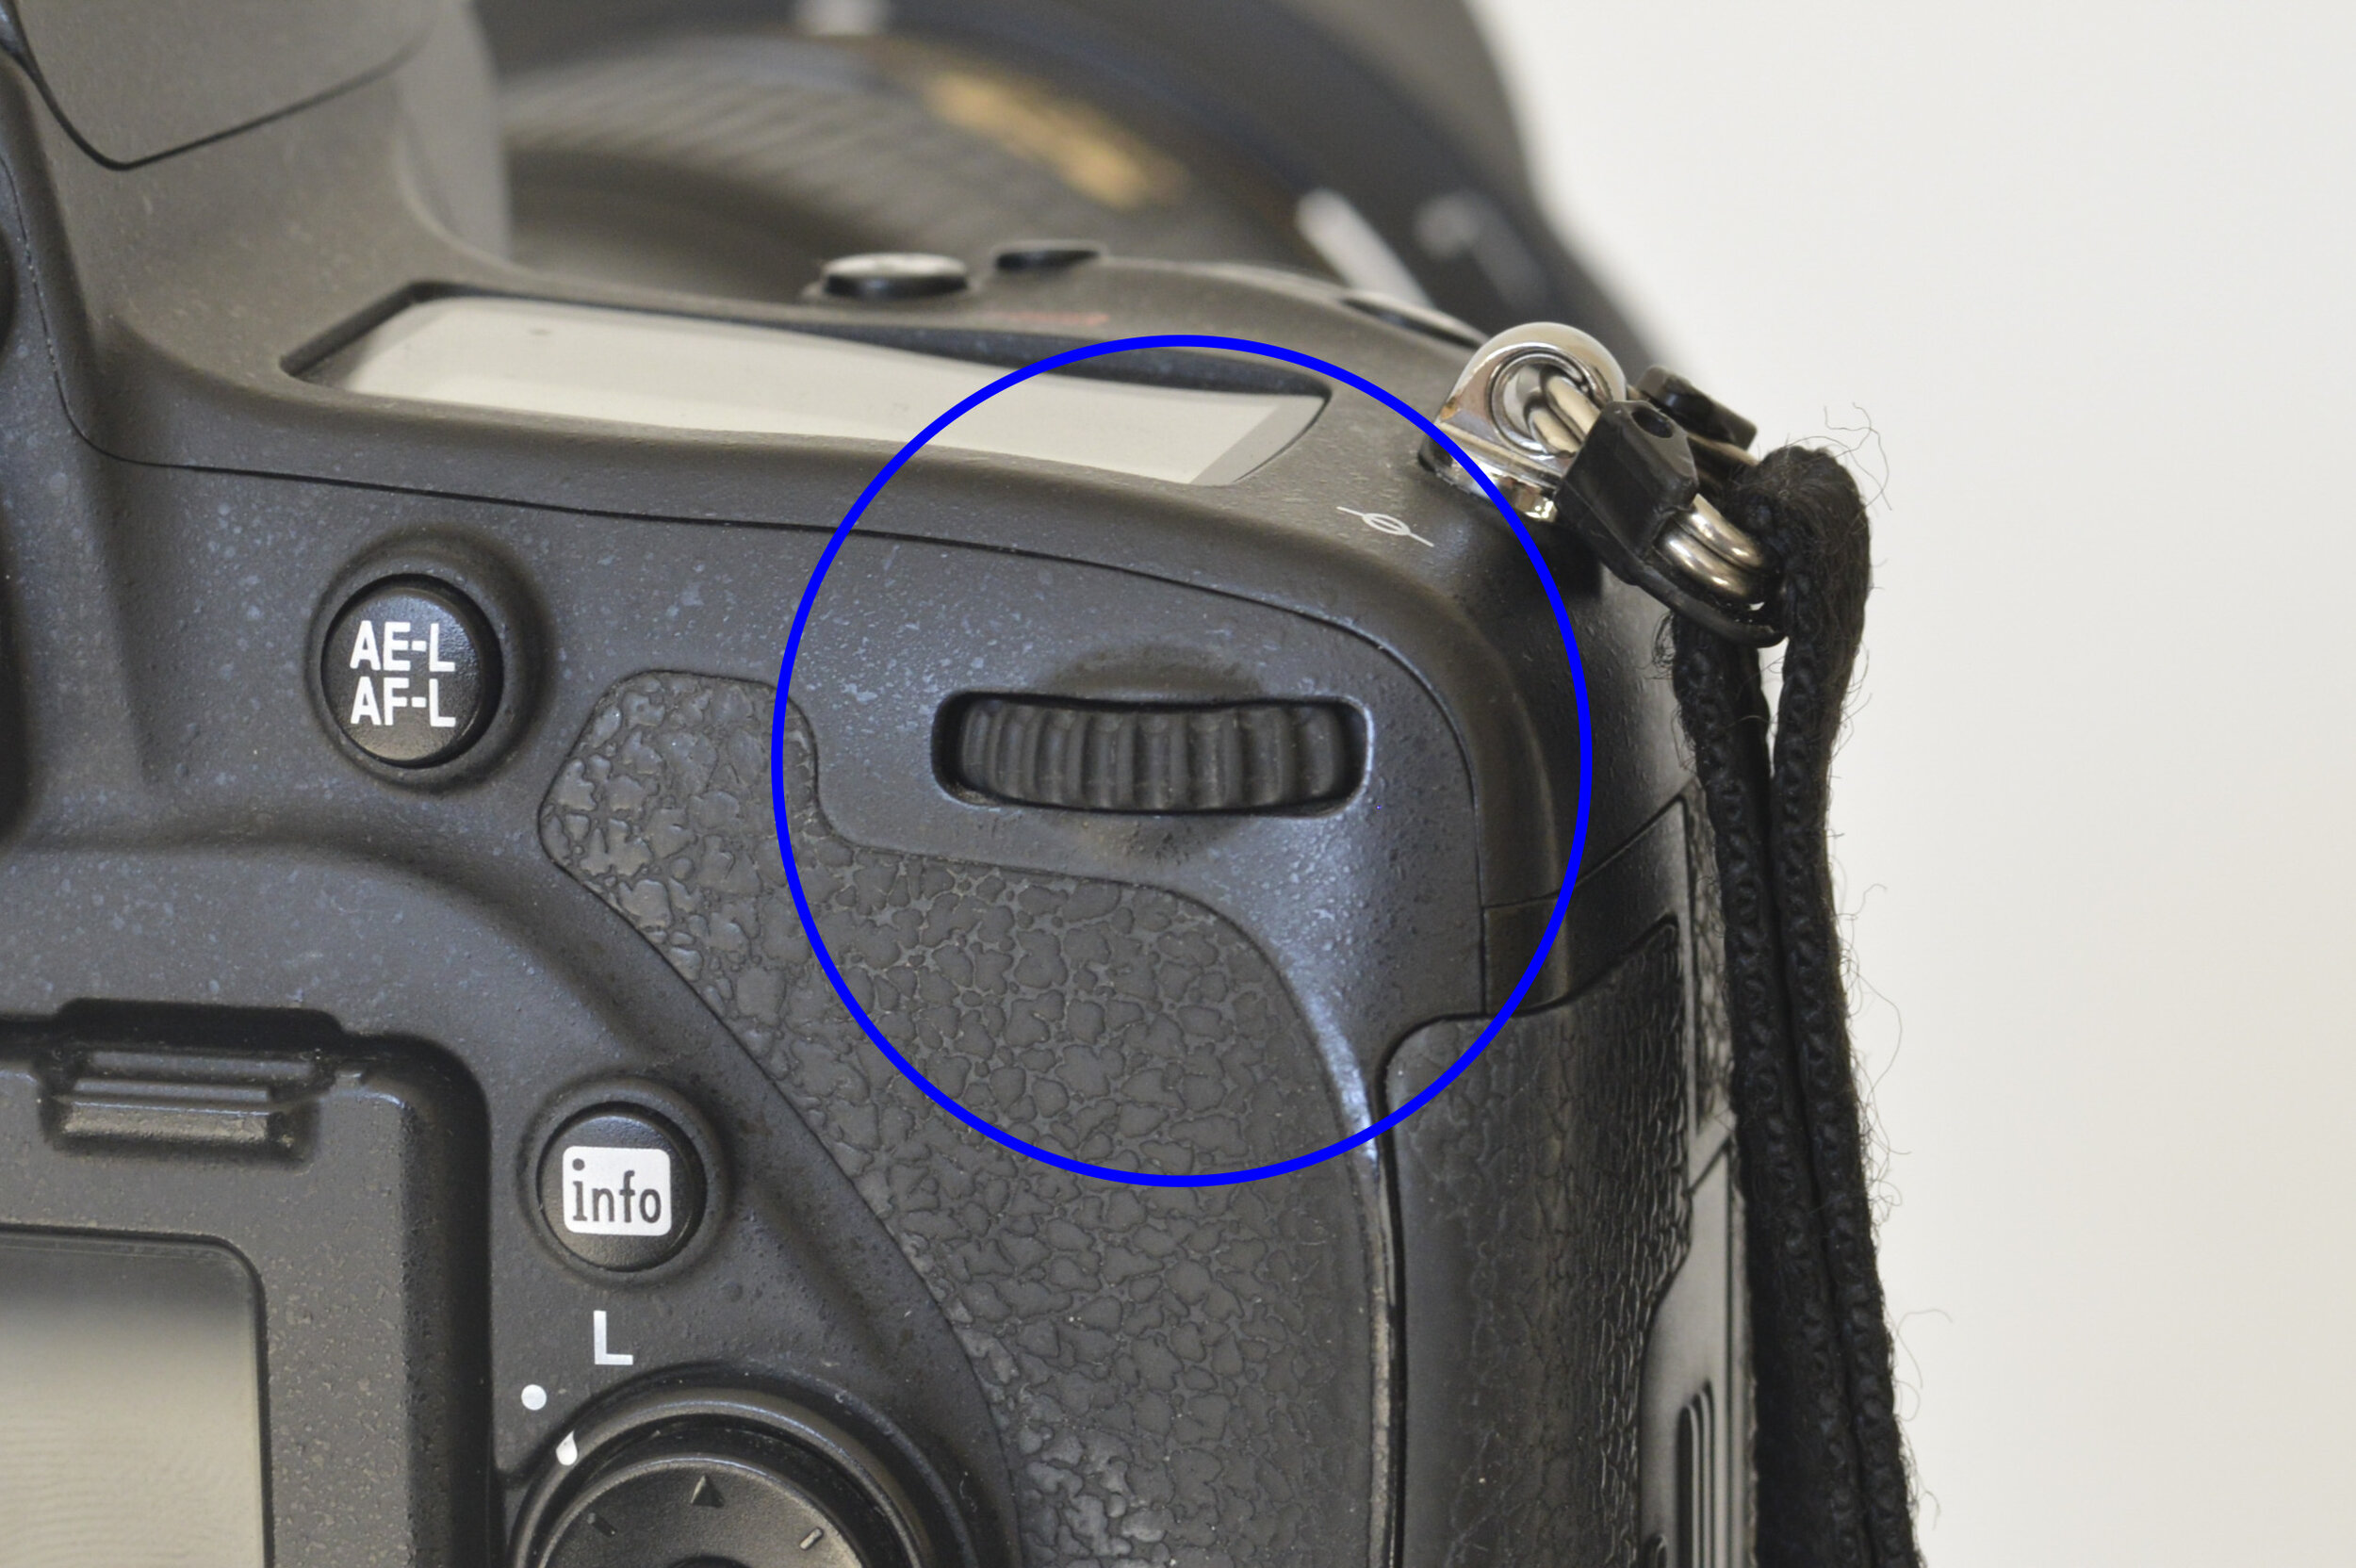
Wheel Selector
You will use this wheel for many reasons but it is mostly used for scrolling between settings or adjusting them.
Info
You can press this button to see the various settings you currently have set. During image playback, instead of your settings it will display the image metadata, histogram, and other information about the photo.

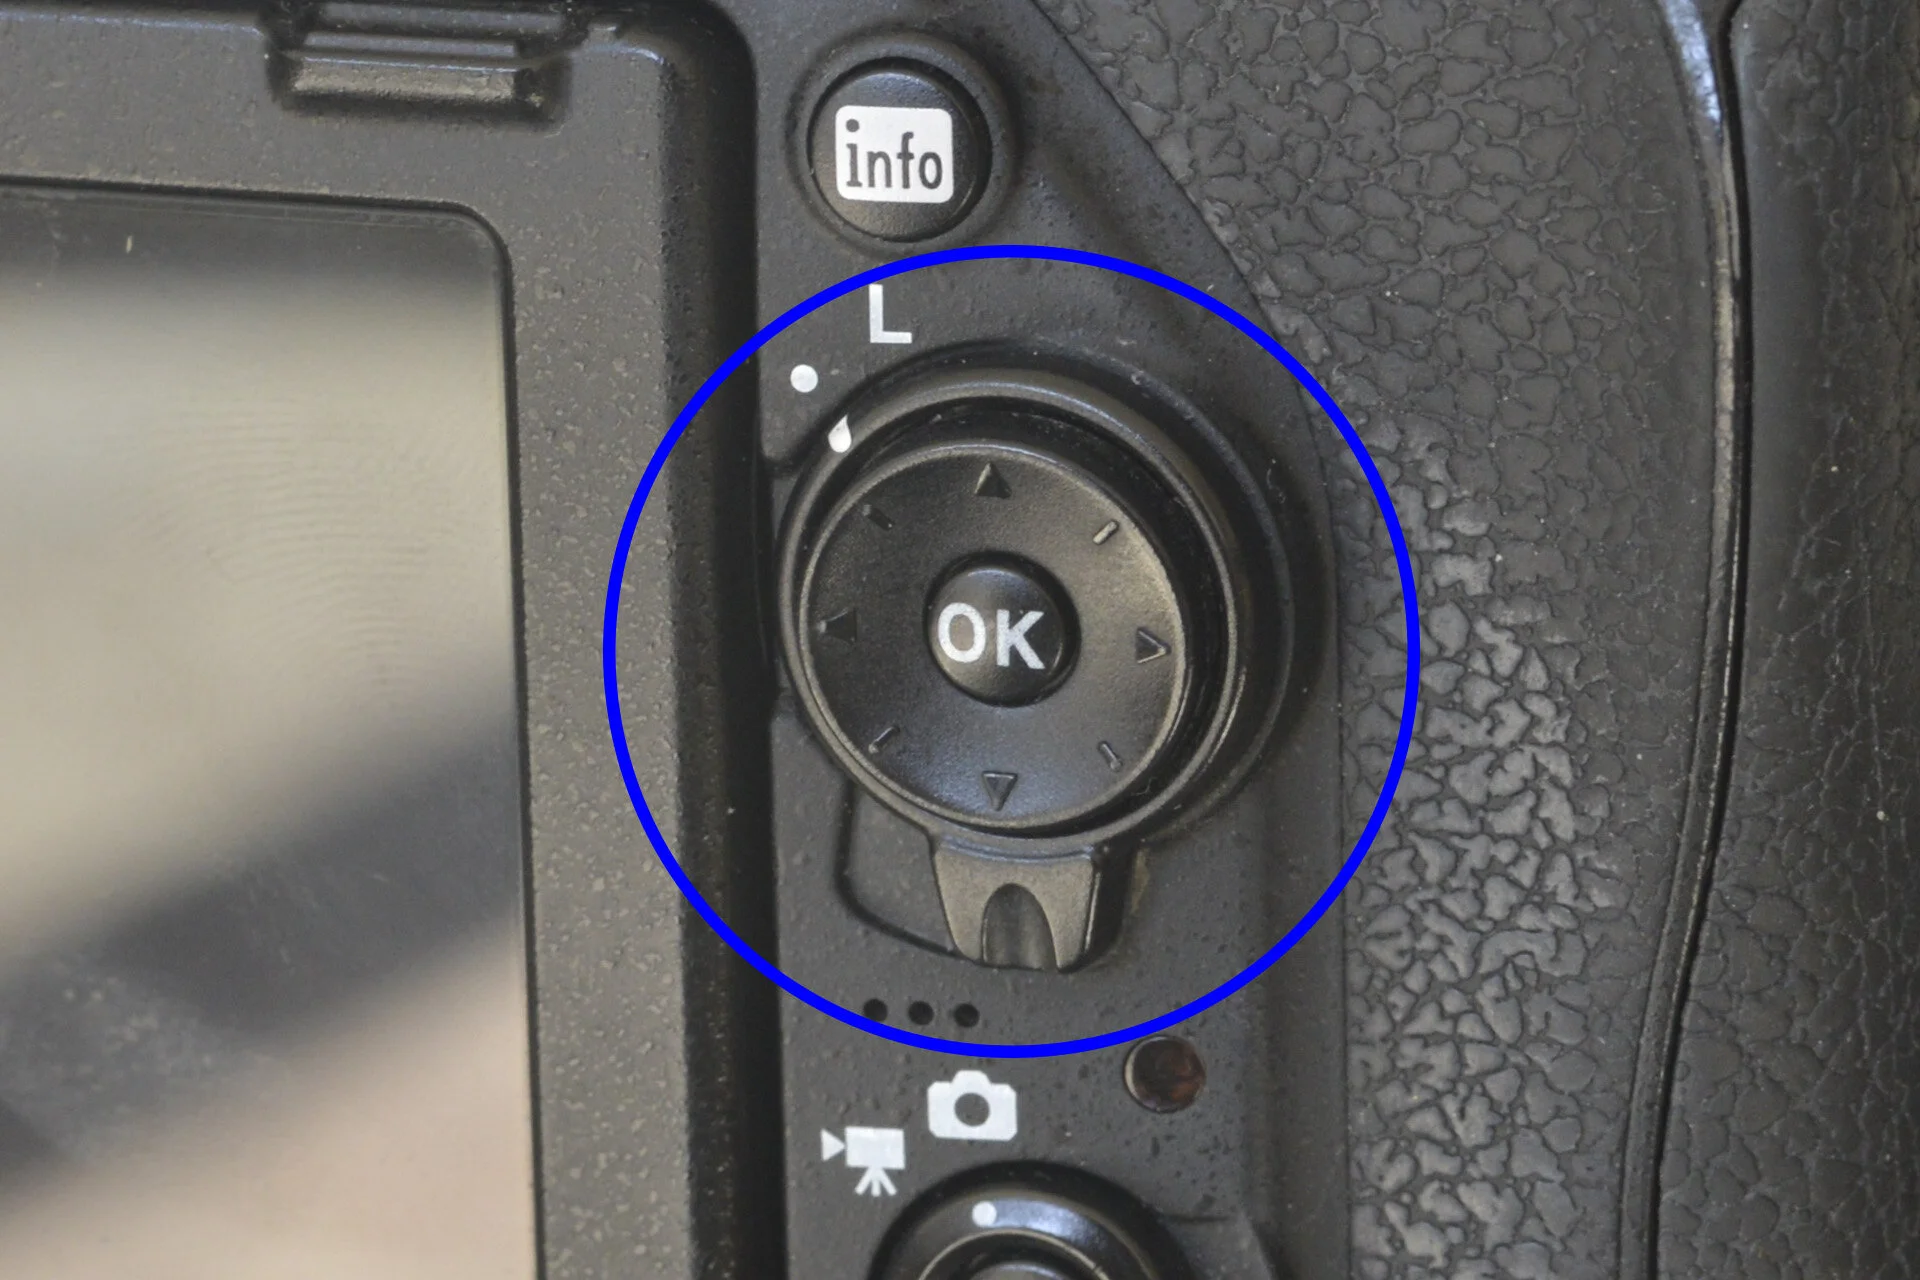
Selector
Use this wheel to scroll through your images or to select certain settings in your menu.
Live View
Pressing Live View (Lv) locks the mirror, blocking the viewfinder and displaying the scene in front of you on the LCD screen instead. Most DSLRs will not allow you to shoot video unless you are in Live View. You can switch between stills photography live view and video live view by flicking the switch left or right.

Delete
This allows you to delete photos from your memory card in-camera.

Play Back
Allows you to view any photos you’ve taken.

Menu
This will bring up all the internal menu’s in your camera, allowing you to alter many different settings and even edit your stored photos. Some menu options will be greyed out and therefore unavailable depending on the mode you are shooting in.


White Balance
Not present on every DSLR, but if you have it, this button is a shortcut that allows you to alter the white balance (WB) without going into your menu settings to change it. You can change it to auto or to whichever scene is appropriate. You can even go completely manual and adjust the degrees kelvin if you are after a very specific look. If your WB button also has a ‘?’ icon, you can also press this button and a quick summary of the selected setting will appear, which is very useful if you are scrolling through your menu and there is a setting you are unsure of. In playback you can also use this button to ‘lock’ any photos therefore stopping them from being accidentally deleted.


Quality
Pressing this button will enable you to check and alter the image quality you are shooting at. You can change the size and ratio of your images or switch between JPEG and RAW formats. Pressing this whilst in playback will also enable you to zoom into the image.


ISO
Pressing this button will enable you to check and alter the ISO settings. You can quickly change it from auto to manual or change the sensitivity using the scrolling wheel. Pressing this whilst in playback will also enable you to zoom out of the image.


‘i’ Button
This brings up a quick shooting menu (may be labelled as ‘Q’ instead of ‘i’ on some DSLRs). Here you can quickly change any settings that don’t have a button shortcut such as picture control, d-lighting and more.


SD Card Slots
Where you place your memory cards. Most cameras have dual slots now, but there are still those with single slots, or cameras that can take both SD and larger CF cards.

Cable Plugins
This is where you can plug in a mic for audio if you are shooting video or you can plug in a remote cable release here too. Most DSLRs will also have more advanced options like HDMI outputs.


Pop-Up Flash
If you are shooting in any of the manual modes but still require flash, you can press this button to engage the pop-up flash. Using the in-built flash is usually not recommended though as it usually creates very warm, harsh light.


Bracketing
If you are taking a photo that has a very high contrast (lots of very bright and lots of very dark parts together) then you can use bracketing. This is where you take three photos, one correctly exposed, one underexposed and one overexposed. You then layer these images together to bring detail into the brightest and darkest parts of the image. Pressing the bracketing button (BKT) will enable you to adjust the exposure of each of the three shots.


Lens Unlock
Press this to unlock your lens from the camera then twist the lens to remove it and change to another.

AF/M
This button will appear both on your camera and on your lens. If you don’t want the camera to auto-focus for you then you can switch this to M (manual) and you can adjust the focus manually.


Lens
This is the optical device attached to your camera to create your images. A DSLR allows you to change to different lenses. Different lenses will have different focal lengths therefore the type of lens you use will depend on what you intend to be photographing.

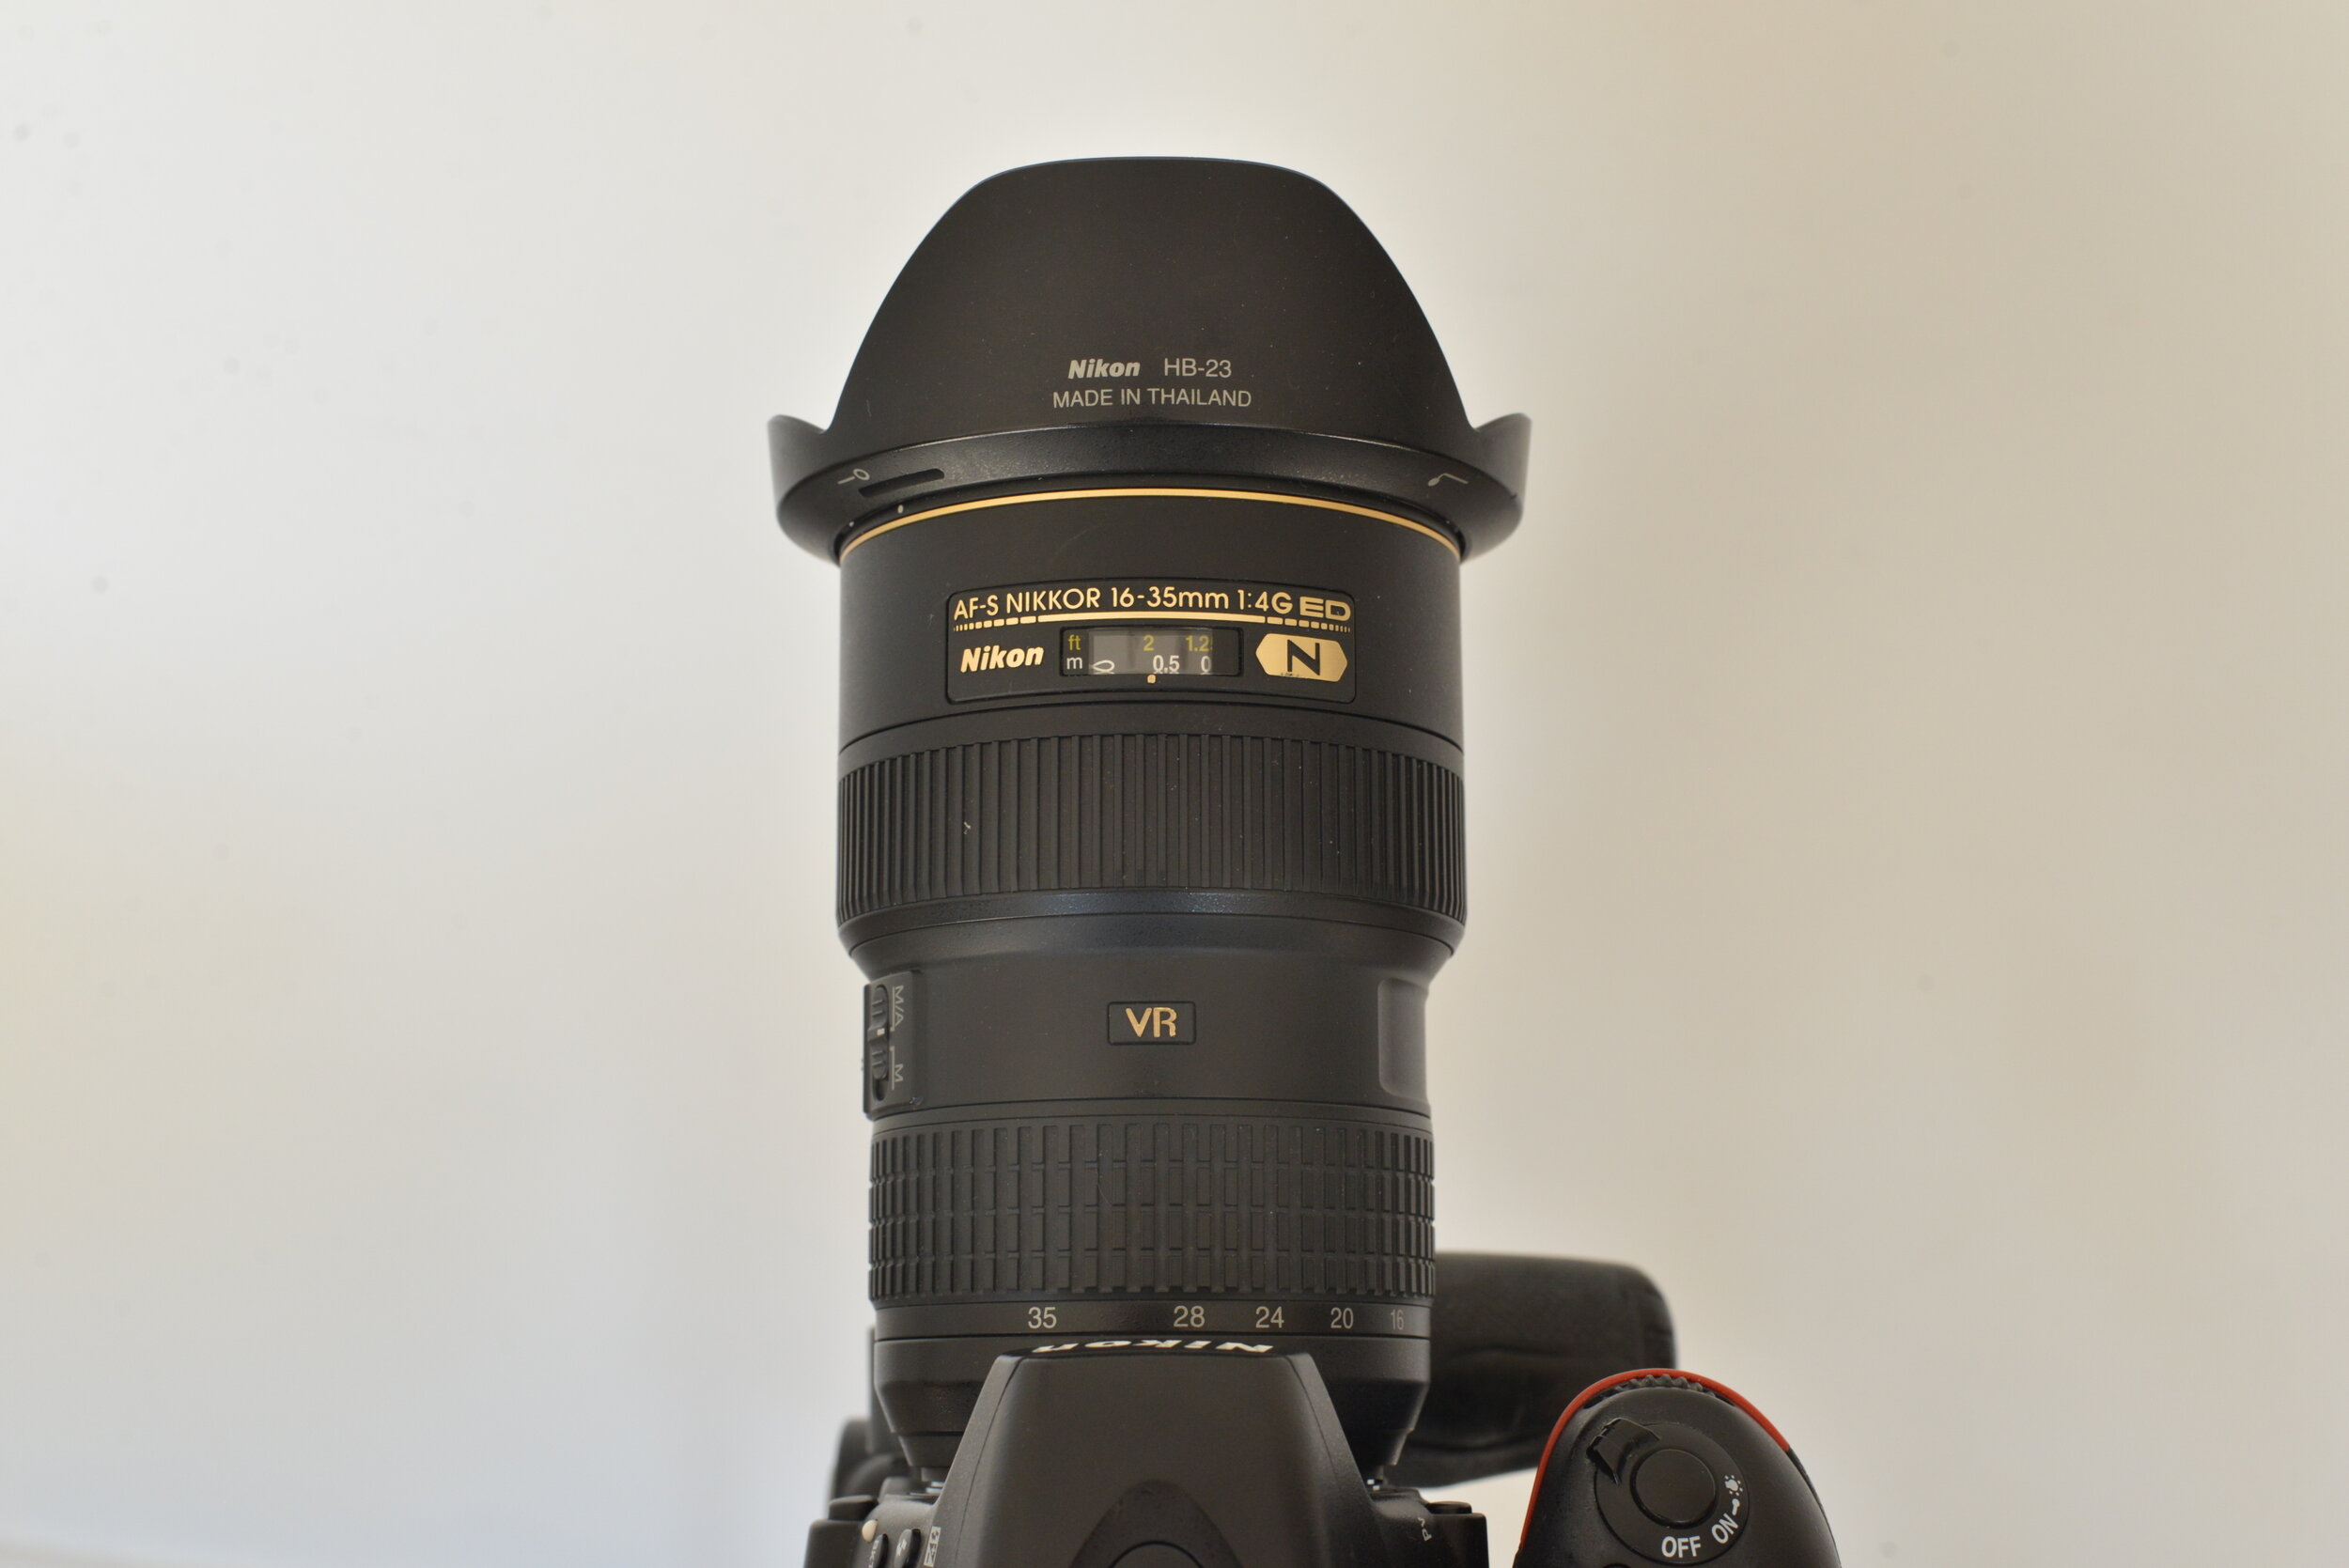
Focus (MA/M)
Just like the AF/M button on your camera this will allow the lens to auto-focus or for you to focus it manually yourself.

VR
VR stands for vibration reduction. It is always recommended to have this on if you are shooting handheld as it minimizes blur caused from your hands shaking. The larger the lens the more you will need VR. If you use a shutter speed over 1/500 or are using a tripod however, then this should always be switched off as it is unnecessary.

Display
This will tell you the measurement of your depth of field with the settings you currently have selected, measured in feet and in metres.

Focus Ring
This allows you to manual adjust the focus of your lens.

Zoom
This allows you to zoom in and out with your lens. Prime lenses have fixed focal lengths and therefore do not have the ability to zoom.

I hope this was a helpful beginners guide to your camera and it’s functions! For more information on your camera’s various settings, keep an eye out for my next post next week where I will be going through all the in-menu settings and what they all mean!
All images in this post are copyright (c) of Aby-Joanne Photography.