
Movie Shooting Menu- Every Setting On Your DSLR Explained (Part Four)


Understanding all your camera’s capabilities is a huge advantage when trying to create great photos. DSLRs have a huge variety of settings and features, most of which people either don’t understand, or just simply ignore. This is a comprehensive guide to every single one of your cameras settings, where they are, and what they do. I will go through what every button does, and what all the menu settings do, and I will be using a Nikon D600 for this tutorial. Every camera is different, so therefore your camera may differ slightly, but the majority of the settings are universal across most camera brands, you just may find that some buttons or settings may be in different places. There’s a huge amount of information, therefore I will be splitting this post into multiple parts. Here in part four, we shall go through the in-camera ‘Movie Shooting’ menu.
Movie Shooting Menu
The Movie Shooting menu allows you to alter any settings that apply to movie clips. You can adjust different frame rates, video file size and name, video quality, mic sensitivity and so on, as well as normal exposure and colour settings such as white balance and ISO sensitivity.
Reset Movie Shooting Menu
This allows you to reset this entire menu to it’s default settings if you no longer wish to use any current custom settings.


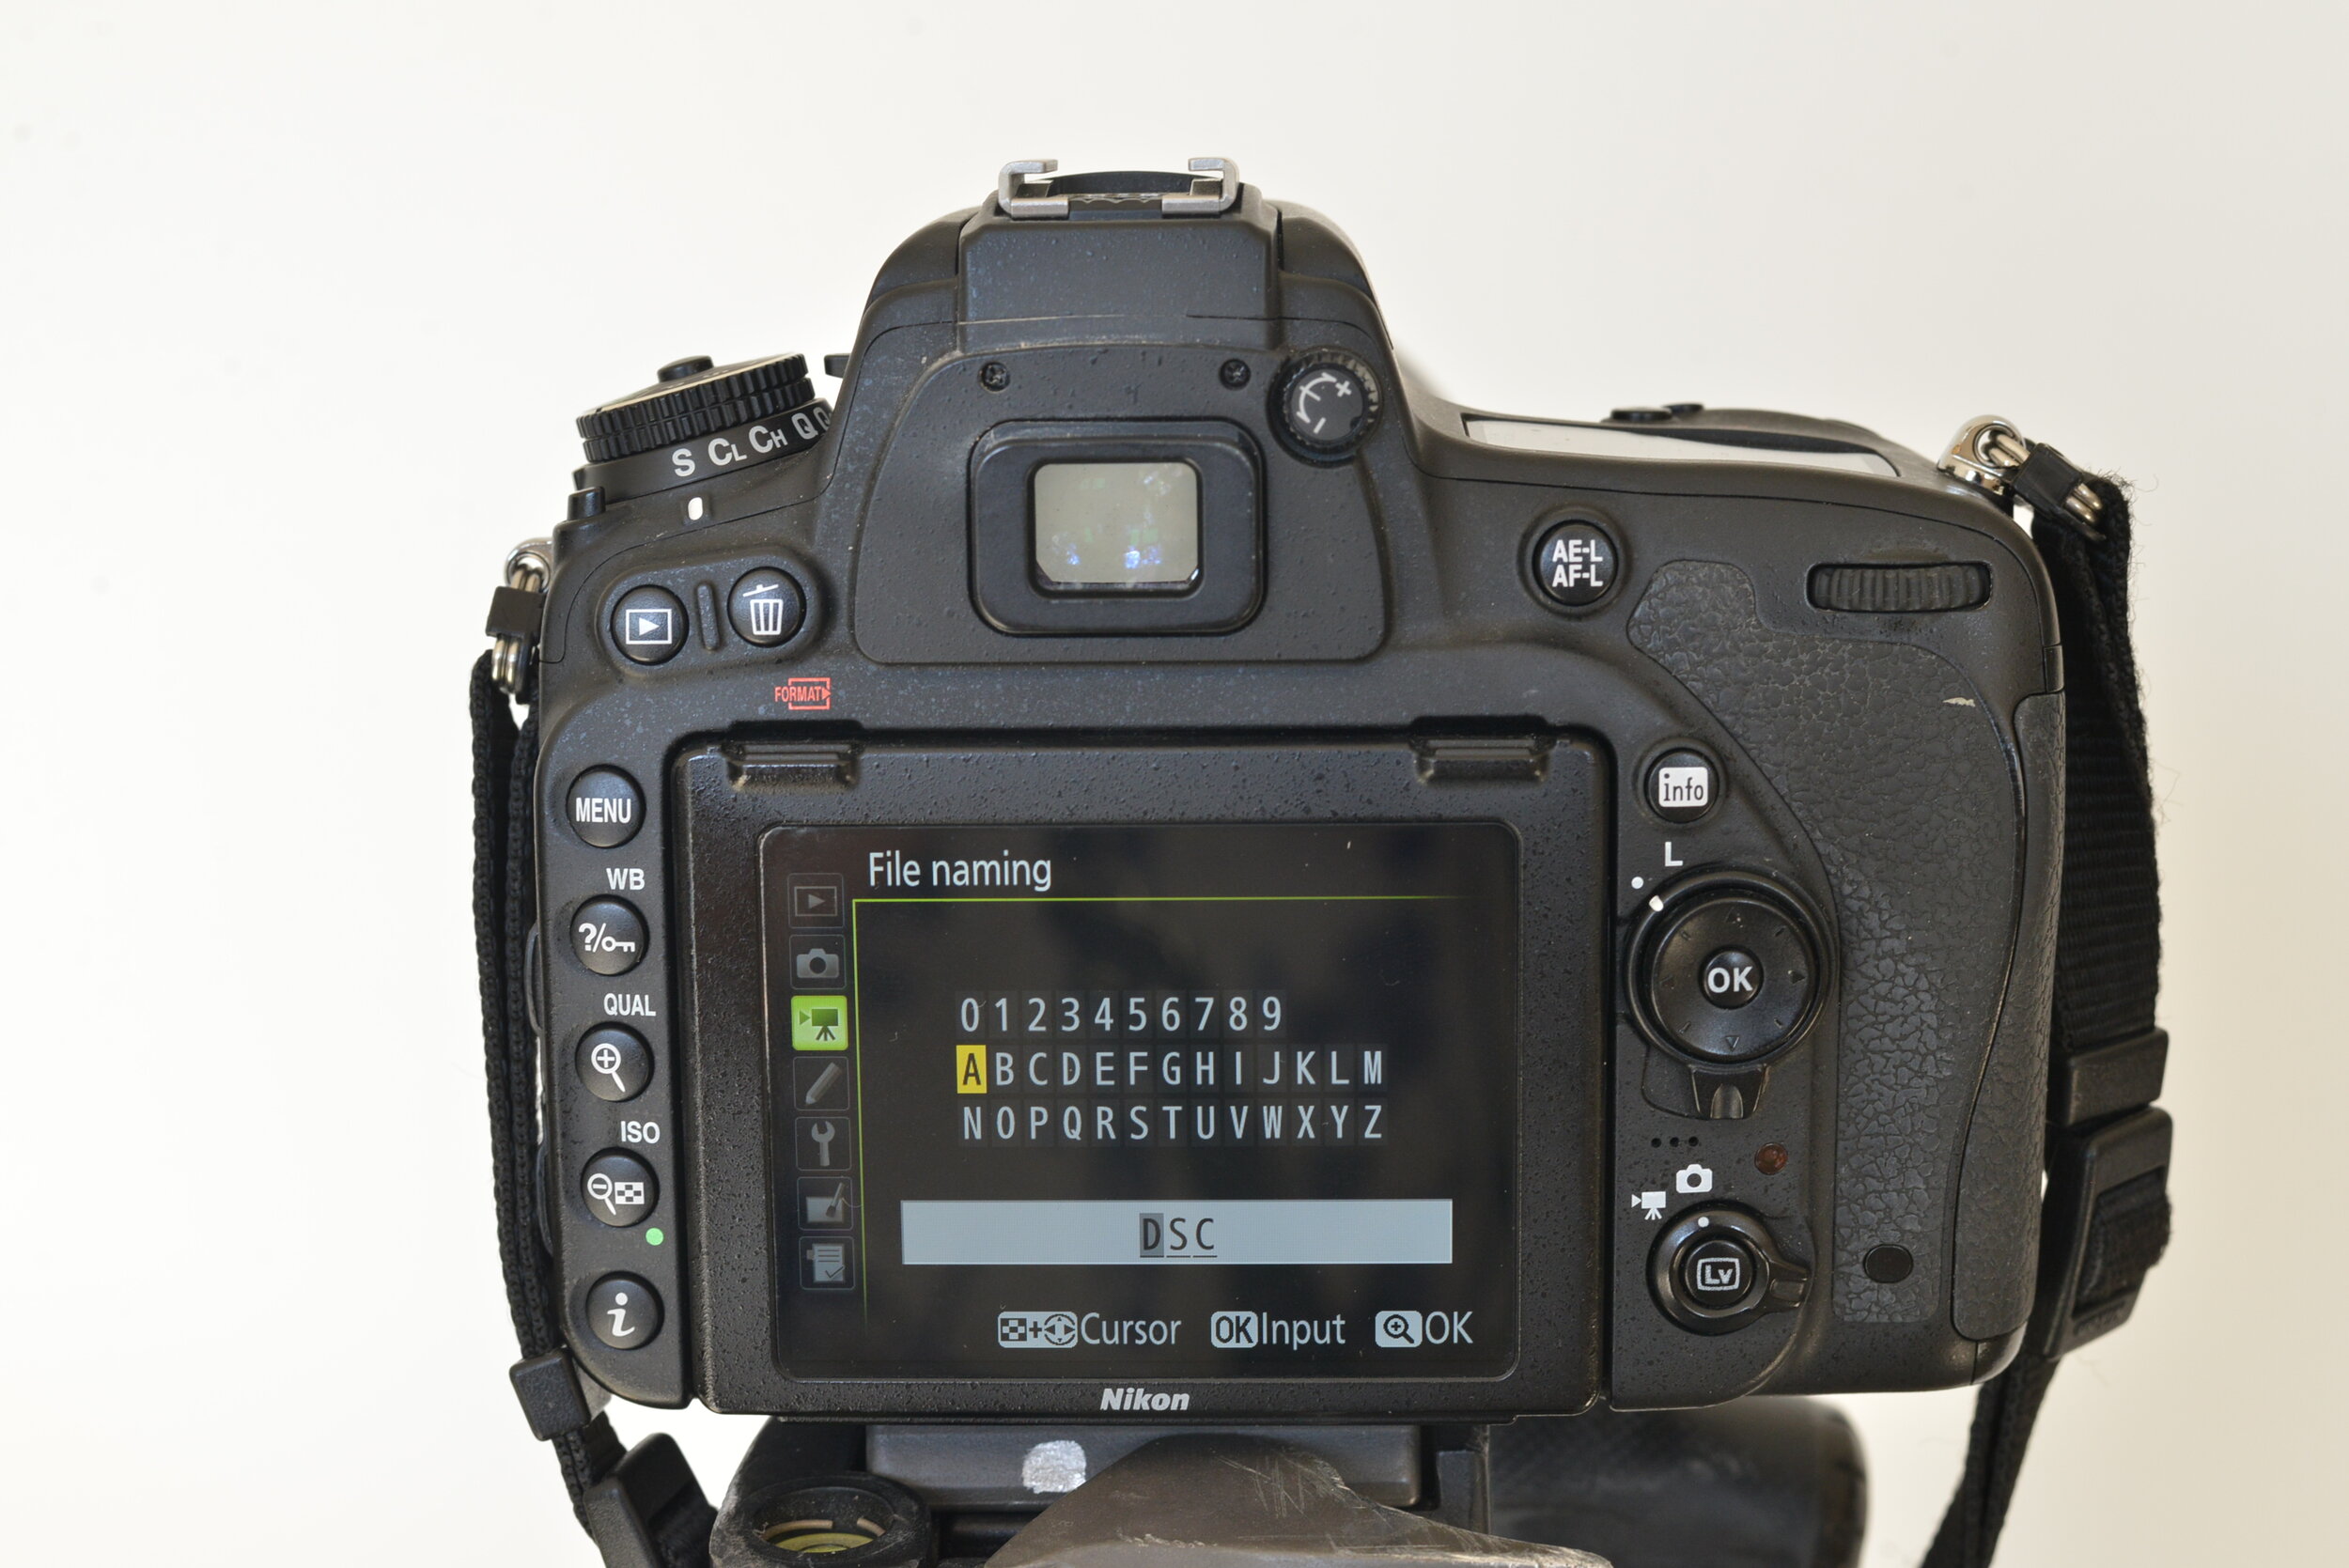
File Naming
As standard, most videos (like photos) are automatically named with the ‘DSC’ prefix followed by a four digit number (indicating how many photos or videos have been taken) for example your 23rd video on your card will be named DSC_0023.mov. This number will reset and begin again with ‘0001’ every time you format your card. If you want to use a different prefix to ‘DSC’ you can change that using this menu.

Destination
You can choose where your videos are stored if you have dual card slots. For example, you can leave it as default on slot 1, and any still images and video files will be recorded together on the same card in the order they were shot in. If you want to separate your still images from your video files though, you can set the camera up to store any video files to your second card instead.


Frame Size/ Frame Rate
You can determine the file size (in pixels) and the frame rate (frames per second) using this menu. The higher the resolution, the better the quality and larger the file. Also the higher the frame rate, the more images taken per second, which not only produces more fluid motion, but is also useful if you are planning to slow down the footage to create slow motion.


Movie Quality
Choosing high quality will improve the quality of your video, but note that it will also increase the file size which will limit the storage capacity.


Microphone Sensitivity
Here you can choose whether the camera decides on the microphone sensitivity automatically or give yourself full control. Allowing the camera to choose the sensitivity automatically may be easier but you are at risk of any pitch becoming too high (which causes sound distortion). You can also choose to have the mic turned off completely if you want to film anything silently.


Frequency Response
If you are filming someone talking or a particular directional noise, and want to reduce any extra ambient noise, then you should choose ‘vocal range’. If you are filming clips of street scenes or anything that does require ambient noise, then you should choose ‘wide range’ instead.
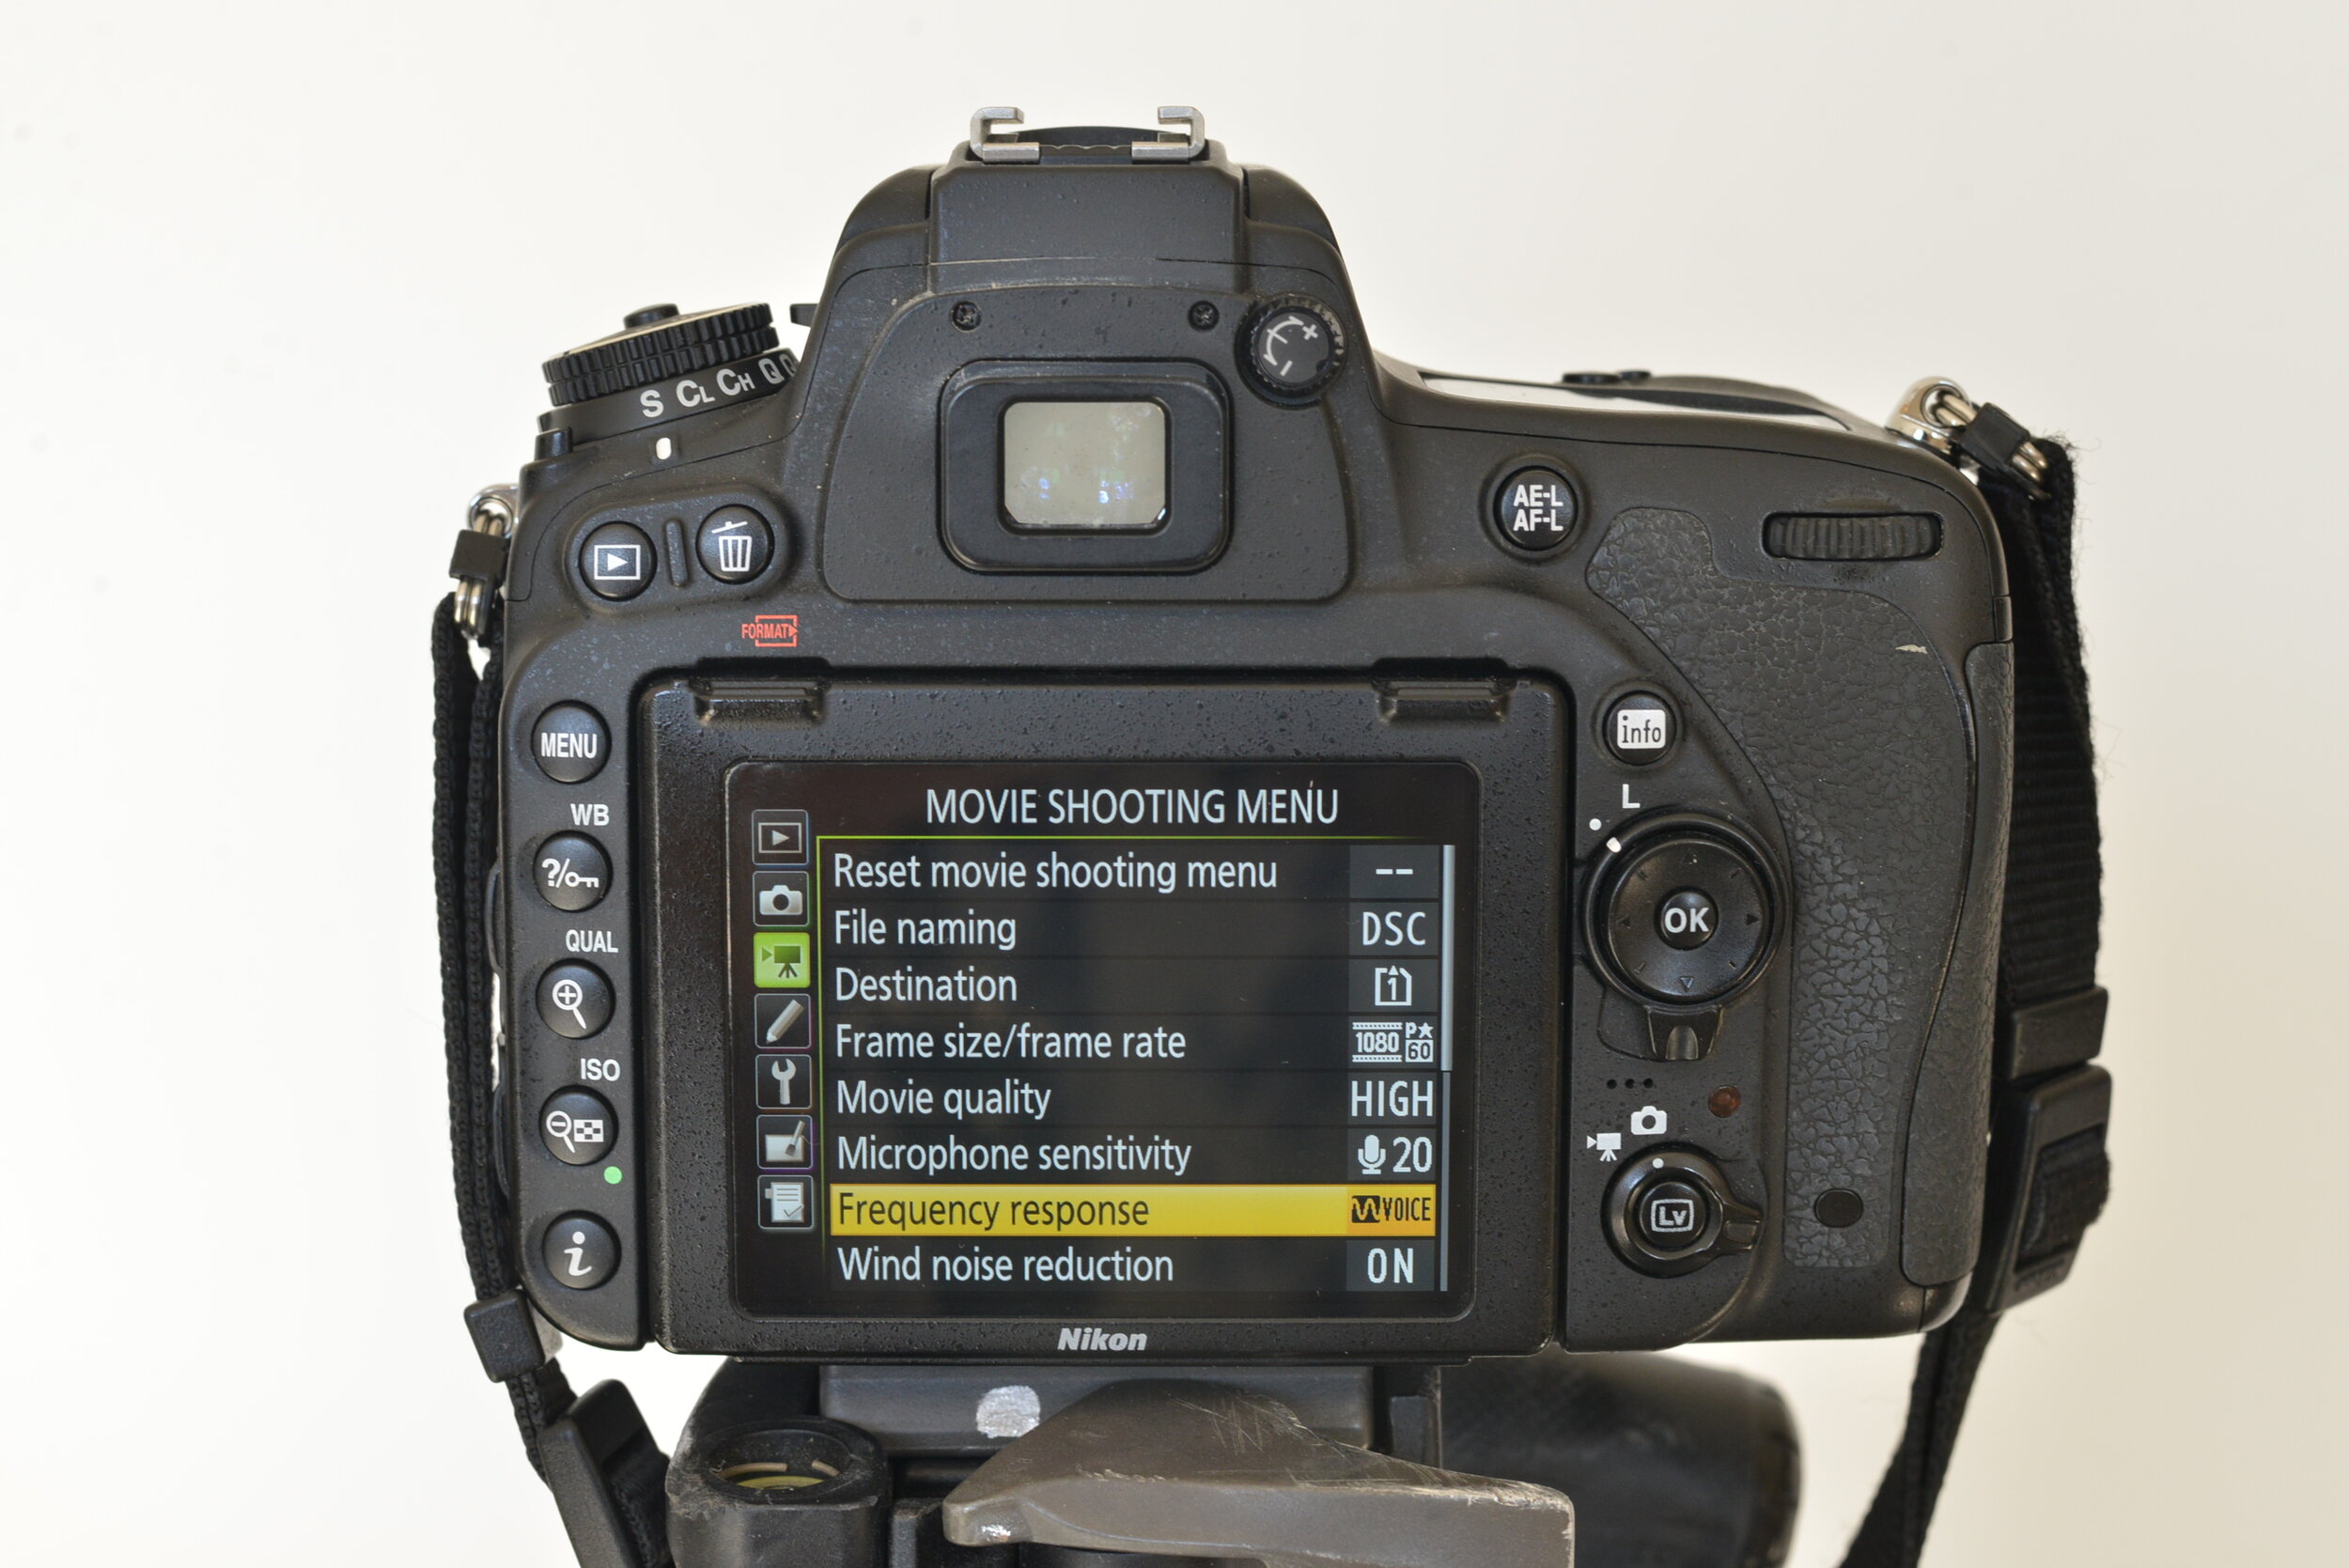

Wind Noise Reduction
Turning this option on will reduce any noise produced by the wind as it blows over the in-built microphone, using a low-cut filter. It is important to note that this can also reduce other ambient noises too.


Image Area
This camera is a full frame camera (the digital comparison for a 35mm film camera) therefore using this menu you can choose whether to shoot at full frame or with a cropped sensor instead. Using a DX lens on a full frame camera or using this Auto DX Crop option will cause any videos you take to be slightly more ‘zoomed in’ than usual without having to change your lens. You can read more about crop sensors and how they work on my blog post about camera terminology here.
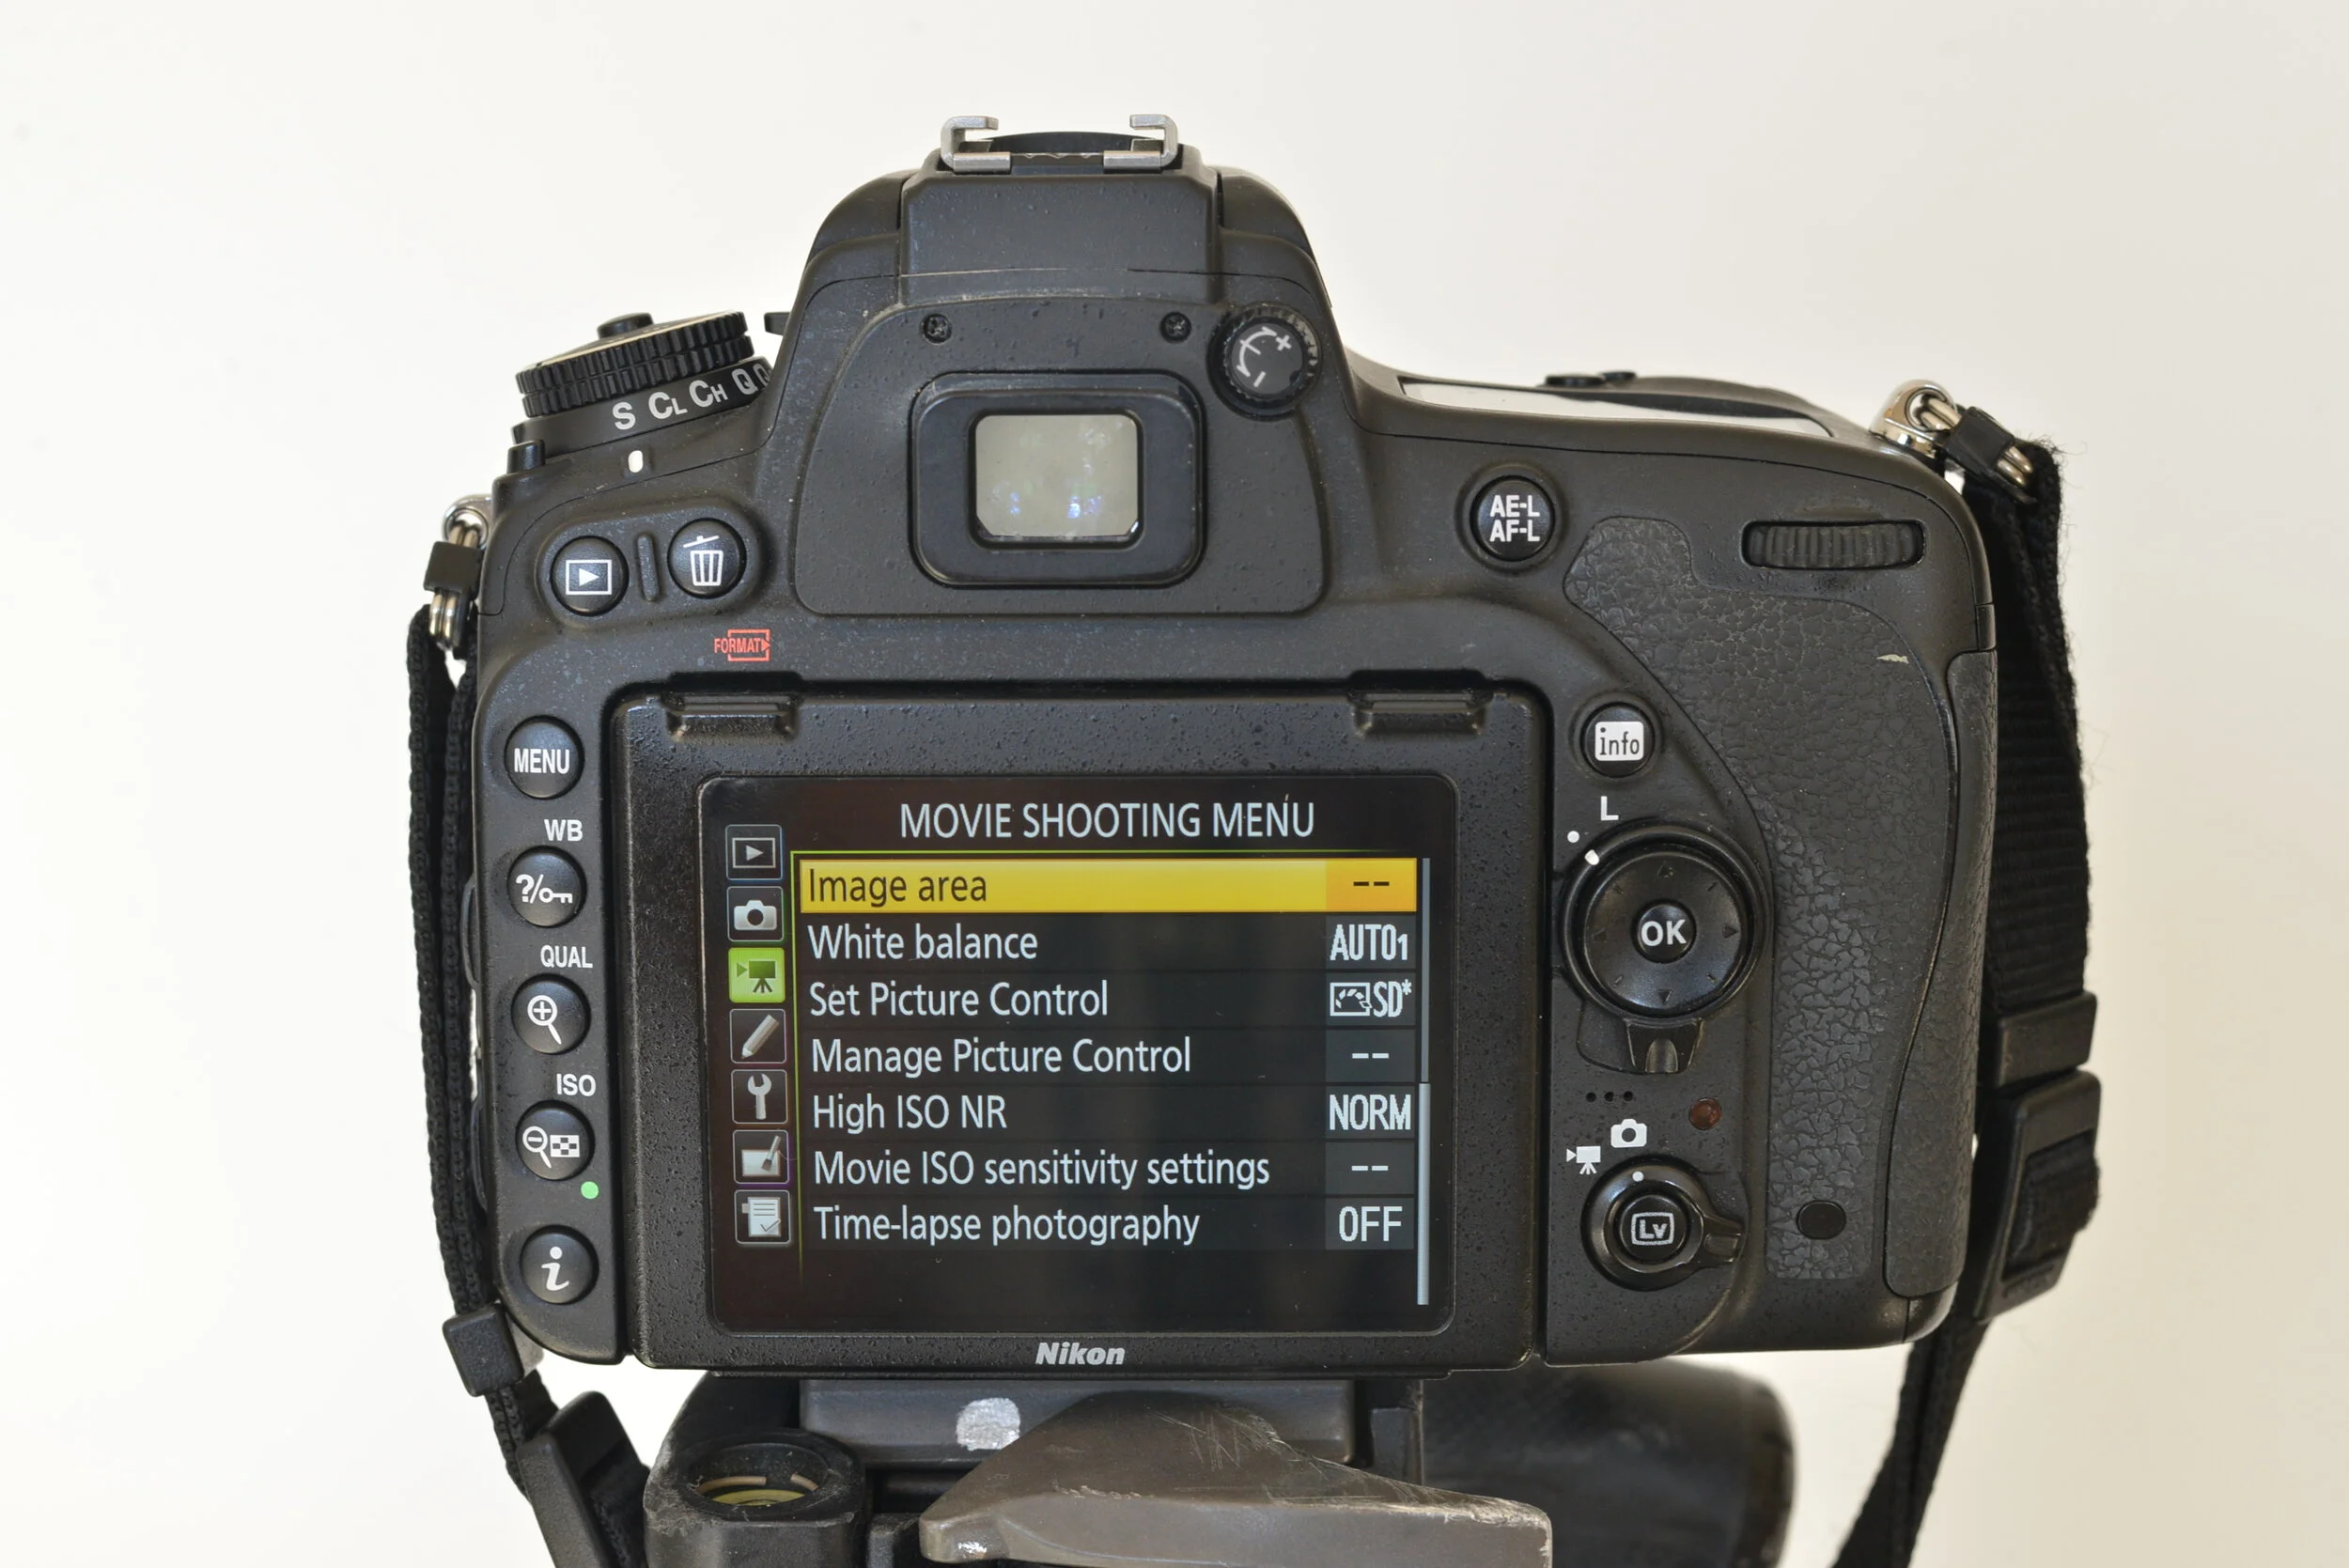

White Balance
This is a more in-depth way of altering your white balance instead of using the button short-cut (if your camera has one). Here you can adjust your white balance to match the light source of your surroundings. If none of the preset white balances are working for you, you can also set it to manual and adjust the degrees kelvin to your desired colour temperature.


Set Picture Control
In this menu you can decide how your movies are processed. You can keep it at the same settings you are using for still photos or if you are after a different effect you can choose from many different options below, most of which effect how the colours of your movie are processed. ‘Standard’ is a general setting recommended for most situations. ‘Neutral’ means the camera will do very minimal processing to the clip, which is typically the best option if you plan on doing any editing later. ‘Vivid’ processes the clip to enhance the primary colours. ‘Monochrome’ means all your clips will be processed in black and white. ‘Portrait’ is a good mode to use if videoing people as it processes the clip to be more flattering to skin tone and texture. ‘Landscape’ is similar to vivid, as it enhances particular colours creating more vivid landscapes. Choosing ‘Flat’ is another good option if you are planning on heavily editing any of your clips as it saves more detail over a wider colour range.


Manage Picture Control
In this menu you can create your own Picture Control setting if none of the presets are achieving the effect you are after. You can edit any of the preset picture controls and save them as new options. You can also apply any of your custom settings to all the images on a certain card by selecting Load/Save.


High ISO NR
NR stands for Noise Reduction. When creating video clips using a high ISO, you may see an increased amount of noise (grain). By selecting low, normal or high, your clip will be processed in-camera to reduce any effects caused by excess noise. Using this menu will mean it takes longer for the clip to be saved to the memory card.


Movie ISO Sensitivity Settings
If you don’t have a shortcut button to adjust the ISO then you can do so in this menu. The higher the ISO, the brighter your clip will be, though it’s important to remember that the higher the ISO, the more noise will appear too. In this menu you can also set the ISO to auto if you want the camera to decide for you. If using auto, you can also set a maximum ISO, so the camera will never go over a sensitivity that would introduce noise to the clip. If you want to use the ISO shortcut button but are unsure how to, you can read my blog post about camera buttons and switches here.


Time-Lapse Photography
This is where the camera takes a photo at pre-determined intervals and combines the images to create an almost ‘stop-motion’ like movie. It will take photos using the same settings you are using to record video clips, for example at the same frame rate, size and quality.


Hopefully this was helpful for you and allowed you to understand your camera a bit better. If you want to learn more about in-camera menus, make sure to keep your eye out for Part Five of ‘Every Setting On Your DSLR Explained’, where I will go through the custom settings menu and what each option does. You can also read more about the movie shooting menu here in the online Nikon manual.
All images in this post are copyright (c) of Aby-Joanne Photography.